在Magento 2中,我们可以在后台上创建许多产品属性和属性组。但有时我们可能需要通过可安装脚本创建新的产品属性和属性组。例如,当我们在Magento 2中开发新扩展或自定义Magento 2的原生功能时,我们必须使用可安装脚本来创建新的产品属性和属性组。创建产品属性和属性组不是一件困难的事,本文将帮助您通过InstallData.php在Magento 2中创建新的属性组和产品属性。
假设我们将使用以下脚本创建一个名为“My Custom Attribute Group”的新属性组和名为“My Sample Attribute”的产品属性。
第1步:定义新模块
为了在Magento 2中创建新的扩展,首先我们必须在下面的文件路径中创建一个名为module.xml的文件来定义新模块,
文件路径:app/code/Alwayly/MyAttribute/etc/module.xml
<?xml version="1.0"?>
<config xmlns:xsi="http://www.w3.org/2001/XMLSchema-instance" xsi:noNamespaceSchemaLocation="../../../../../lib/internal/Magento/Framework/Module/etc/module.xsd">
    <module name="Alwayly_MyAttribute" setup_version="1.0.0">
        <sequence>
            <module name="Magento_Catalog"/>
        </sequence>
    </module>
</config>
接下来,在下面的文件路径中创建registration.php文件,
文件路径:app/code/Alwayly/MyAttribute/registration.php
<?php
    \Magento\Framework\Component\ComponentRegistrar::register(
        \Magento\Framework\Component\ComponentRegistrar::MODULE,
        'Alwayly_MyAttribute',
        __DIR__
    );
第2步:创建安装文件InstallData.php
然后,在以下文件路径中创建名为InstallData.php的文件。在此文件中,我们必须提供新创建的产品属性组的名称和属性信息,
文件路径:app/code/Alwayly/MyAttribute/Setup/InstallData.php
<?php
namespace Alwayly\MyAttribute\Setup;

use Magento\Eav\Setup\EavSetup;
use Magento\Eav\Setup\EavSetupFactory;
use Magento\Framework\Setup\InstallDataInterface;
use Magento\Framework\Setup\ModuleContextInterface;
use Magento\Framework\Setup\ModuleDataSetupInterface;
use Magento\Eav\Model\Config;

class InstallData implements InstallDataInterface
{
    private $eavSetupFactory;

    public function __construct(EavSetupFactory $eavSetupFactory, Config $eavConfig)
    {
        $this->eavSetupFactory = $eavSetupFactory;
        $this->eavConfig = $eavConfig;
    }

    public function install(ModuleDataSetupInterface $setup, ModuleContextInterface $context)
    {
        $eavSetup = $this->eavSetupFactory->create(['setup' => $setup]);

        $eavSetup->addAttribute(
            \Magento\Catalog\Model\Product::ENTITY,
            'my_sample_attribute',
            [
                'group' => 'My Custom Attribute Group',
                'type' => 'varchar',
                'backend' => '',
                'frontend' => '',
                'label' => 'My Sample Attribute',
                'input' => 'text',
                'note' => 'My Sample Attribute',
                'class' => '',
                'source' => '',
                'global' => \Magento\Eav\Model\Entity\Attribute\ScopedAttributeInterface::SCOPE_GLOBAL,
                'visible' => true,
                'required' => false,
                'user_defined' => true,
                'default' => '',
                'searchable' => false,
                'filterable' => false,
                'comparable' => false,
                'visible_on_front' => true,
                'used_in_product_listing' => true,
                'unique' => false,
                'apply_to' => 'simple'
            ]
        );
    }
}
第3步:模块设置升级
最后,我们必须通过在Magento安装的根目录中运行以下SSH命令来启用我们的新扩展,
php magento module:enable Alwayly_MyAttribute
然后,在CLI中运行以下命令以升级设置,
php magento setup:upgrade
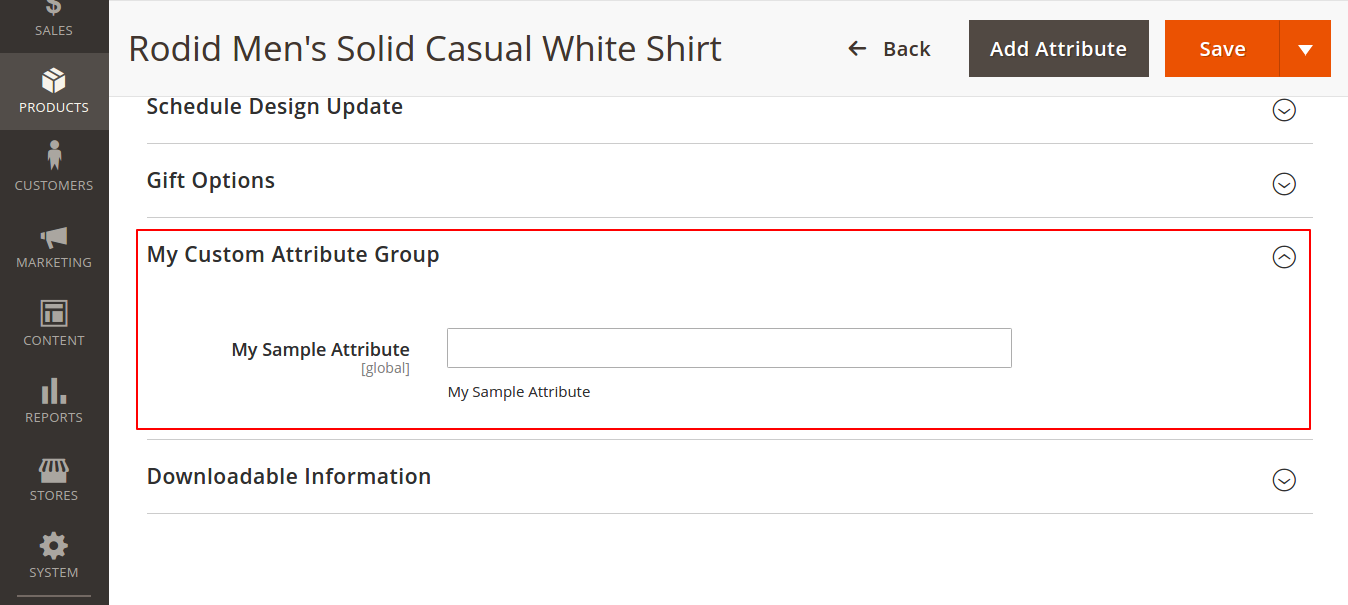
然后,清除缓存并检查您的Magento 2管理员。现在,您可以在管理端查看新创建的产品属性组和产品属性,如下面的参考截图。
参考截图:
希望这可以帮助你。
